Customization
I will only provide the client-side steps required to make it work,
please visit the original topic, if there is one, for more information about the server-side it.
Multi-Iteminfo Support
With the pull request PR #67, I have implemented NeoMind's Multi-Iteminfo Support
into the project, which also changed the iteminfo location and definition.
-
System\itemInfo_EN.lua
This file contains now the table for your custom entries,
as well as the possbility to override offical items, like in Neo's original version.There you also have additional configs/variables for additional and automatic lines,
like Item ID, link to Divine-Pride database and displaying the Server where it's originated from.
These configs can be changed as you like, just follow the values available and you are good to go. -
System\LuaFile514\itemInfo.lua
This is now the itemInfo for translated items, just like the itemInfo_EN.lua before.
The only difference is that it now contains every argument (costume and EffectID).
And I split the function lines at the end into it's own file to make the thing above possible, which was also the reason why they were split. -
System/LuaFiles514\itemInfo_f.lua
Like mentioned above, this now contains the function lines for the itemInfo and will now be the key to overwrite
depending on the client you are using.
Custom Items
Resource Files
Of course you need respective files for your custom items to work.
The basic setup contains 3 files, which is used for every other item as well.
But depending on the item type you want to add you require additional files to see the item correctly, which are descriped in the sections below.
- Drop & Drag Sprite
data\sprite\¾ÆÀÌÅÛ
Responsible to show a sprite if the item is being dropped or dragged, if you don't have one you mostly crash. - Texture Files
data\texture\À¯ÀúÀÎÅÍÆäÀ̽º
\item: This file is reponsible to show an image of your item while it's equipped and in inventory.
\collection: Shows an image when your open the item description.
ItemInfo.lub
Once your files are in place, it's time to open your itemInfo file.
	[ID] = {
		unidentifiedDisplayName = Unknown Item,
		unidentifiedResourceName = ,
		unidentifiedDescriptionName = {  },
		identifiedDisplayName = Item,
		identifiedResourceName = ,
		identifiedDescriptionName = {
			Line 1,
			Line 2
		},
		slotCount = 0,
		ClassNum = 0,
		costume = false
	},
Explanation
The only difference between the first six arguments is that it depends on if the item was Identified or not.
- DisplayName = Display Name
- ResourceName = File Name
- DescriptionName = Description
- slotCount = Defines the amount of visual card slots
- ClassNum = Defines the View ID for Headgears/Weapons/Costume Garments and Shields
- costume = true/false, defines if the item is a costume (showing in a different tab in the storage)
Headgears
Adding custom headgears requires 4 additional files and 2 more lua files to adjust.
Headgear Sprite Files consist of gender_name.act and gender_name.spr, meaning 2 files per gender.
Headgear Files
There are 2 folders, which are for the gender.
data\sprite\¾Ç¼¼»ç¸®\³²(Male)data\sprite\¾Ç¼¼»ç¸®\¿©(Female)
Lua Files
-
data\luafiles514\lua files\datainfo\accessoryid.lub
Contains the ViewID/ClassNum of your headgear.View ID for Item DB
ClassNum for itemInfo.lubNote: Clients have a hardcoded View ID limit, depending on client, it might vary.
2018-06-20 as example has 2000 (I think), so to use a value higher than that
you need to apply the client patch "Increase Headgear ViewID".
Like you want to use 6000 as start then input 7000 or more in the patch. -
data\luafiles514\lua files\datainfo\accname.lub
File Name Entry, only consisting of_name, meaning the client will automatically add the gender at the front.
Costume Headgears
Adding Costume Headgears is no different from regular heagears,
you just change the Locations node (YML) in the item database on your server and
change the costume = false to costume = true in the itemInfo.lub, tho the lua part is optional.
Weapons
Adding a custom Weapon can be done with it's own animation files or without.
Custom Animation Files
- Open the
data\luafiles514\lua files\datainfo\weapontable.lub(See explanation below)
Note Add your entries always after the last entry and to add a,after the previous one. Weapon_IDs
WEAPONTYPE_CustomWeapon = 103WeaponNameTable
[Weapon_IDs.WEAPONTYPE_CustomWeapon] = _customweaponExpansion_Weapon_IDs
[Weapon_IDs.WEAPONTYPE_CustomWeapon] = Weapon_IDs.WEAPONTYPE_
Assign a weapon type based on theWeapon_IDstable but only up toWEAPONTYPE_SWORD_AXE = 30are validBowTypeList
Weapon_IDs.WEAPONTYPE_CustomWeaponThis is only used for bows obviously.- Sprite Files
data\sprite\Àΰ£Á·= Main Folder for Weapon Sprites
Each class has it's own folder and requires 2 files (.act.spr) of your custom weapon per gender.
While you can duplicate them and just rename it for a different class and gender, but the animations won't match the class' movement at all.
The file name depends on yourWeaponNameTableentry above.
See Folder List for info.
Explanation
- Weapon_IDs = Table for each weapon type
These values are used for theClassNumargument in youritemInfo.lubentry, as well as your ViewID in your item db. - WeaponNameTable = Table for the file name
- Expansion_Weapon_IDs = Table to assign the weapon to a weapon type
- WeaponHitWaveNameTable = Table which .wav file should be played for your custom weapon type
- BowTypeList = Table for Bows
Garments (Robes)
Files
Note: I will use Angel_Wing as example.
The Client requires for each class and per gender 2 files (.spr & .act),
but since that might take a while to do and rename,
you can use a generator like this, Garment Generator
and generate the required files for all classes (I haven’t tested it yet)
But let’s test only with 1 class to test:
I’ll use Novice (Male), the sprite name for that is Ãʺ¸ÀÚ_³²
Sprites
- robe (male) =
data\sprite\·Îºê\Angel_Wing\³² - robe (Female) =
data\sprite\·Îºê\Angel_Wing\¿©
Note: You can copy&paste the male sprites into the female folder and rename them like mentioned above.
Step 2 - Lua Files
Afterwards we need to add some entries in the spriterobename.lub and spriterobeid.lub
SpriteRobeID
Add ROBE_Angel_Wing = 84 at the end and a , after the last entry before yours.
SpriteRobeName
- Go to the end of the table
RobeNameTableandRobeNameTable_Eng, add[SPRITE_ROBE_IDs.ROBE_Angel_Wing ] = Angel_Wingat the end and a,after the last entry before yours. - At the end of
RobeTopLayeraddSPRITE_ROBE_IDs.ROBE_Angel_Wing(remember the,)
TransparentItem
If the Wing appears on the ALT+Q but does not appear on the character itself,
you need to make an additional edit in the transparentItem\transparentItem.lub.
It's an extra file that controls the transparency of the item,
this file’s default for non-existent ids is 0 (transparent) so you just open it and add at the end
{ 84, 255, 255, 0 },
84 = is the ID
Convert Custom Wings (Headgears) to Robes
Converting your custom Wings, which can be headgears is fairly simple
Take the guide above in consideration, but instead of extra files for robes,
you take the headgears files from data\sprite\¾Ç¼¼»ç¸®\³² and data\sprite\¾Ç¼¼»ç¸®\¿©
as base and insert them the same way as above in the ·Îºê folder.
Hat Effect
Note I will use c_hateffect and HAT_EF_c_hateffect as example
- Open
data\texture\effectfolder - Move your files in a seperate folder in there
- Open
data\luafiles514\lua files\hateffectinfo\hateffectinfo.lub - Go the last entry of the
HatEFIDtable (ExampleHAT_EF_SERPENT_SHADOW = 180) - Add a
,after it and add in the same way your hateffect with an sequential ID (=Don't skip ID's) - Go to the last entry of
hatEffectTable - Use the following layout entry as base (remember to put an
,after the last entry)
Explanation
- resourceFileName path to the datatextureeffect folder (effect nameeffect_name.str)
- IsIgnoreRiding true makes the hateffect not to adjust to your mount
- isRenderBeforeCharacter true makes the effect appear over the character
- hatEffectPos Y Position (up and down) of the hateffect
- hatEffectPosX X Position (left and right) of the hattect
- isAdjustPositionWhenShrinkState put always true
- isAdjustSizeWhenShrinkState put always true
Custom NPC/Mob/Pet
Lua Files
data\luafiles514\lua files\datainfo\npcidentity.lub
Holds the ID of the respective NPCMobPetdata\luafiles514\lua files\datainfo\jobname.lub
Holds the resource file name of the respective NPCMobPetdata\luafiles514\lua files\datainfo\jobidentity.lub
Required for custom NPCs likenpcidentity.lub, it holds the ID.data\luafiles514\lua files\datainfo\petinfo.lub
Required for custom Pets, see below for a seperate explanation.
Sprite Folders
- Mob and Pet:
data\sprite\¸ó½ºÅÍ - NPC:
data\sprite\npc
PetInfo.lub
- PetNameTable
Contains the resource file name of the pet - PetIllustNameTable
Contains the file name for the image in the Pet Info window - PetIllustNameTable_Eng
English equivalent of the above one - PetAccIDs
Contains the Item ID for Pet Accessories - PetAccActNameTable
Contains the .act file name for Pet Accessories - PetAccActNameTable_Eng
English equivalent of the above one - PetStringTable
Contains the Pet Name - PetEggItemID_PetJobID
Assigns the Egg Item ID to a Pet - PetFoodTable
Assigns the Food Item ID to a Pet
Disable Doram Race
Note Depending on the langtype and Ragexe type (Ragexe.exe or RagexeRE.exe), it will require you to edit different files.
Also it depends on if you have the NEMOWARP patch Always load korea ExternalSettings lua file available or not, if not see link to langtype.
But I will go by the default of langtype 0 and Ragexe.exe
- Open the
data\luafiles514\lua files\service_korea\externalsettings_kr.lub. - Find and edit the following line
MakeableRace = { Doram = true } - Change it to
Doram = false - Save and close the file.
Maps with Navigation/World Map Support
-
datamappostable.txt
At the top of the file you should see #@ (probably 12@), change that to 13@ (That is the array size of the mappostable) Scroll down to the bottom of the file and add the the map you want to add (as well as its coordinates on the map where it should appear) in the following format
[index]#[mapname].rsw#x¹#y¹#x²#y²#- x¹, y¹, x², y² stand for the start and end coordinates of the map box which gets drawn on the world map.
Navigate todata\luafiles514\lua files\worldviewdata\
Find filesworldviewdata_table.lubas well asworldviewdata_language.lub
(if your files are inside a GRF, extract them). - Open your
worldviewdata_language.luband add the following line
MSI_###_[MAPNAME] = Map Display Name,
(if you’re adding it at the end of the array, don’t forget to remove the comma, as it’s the last element of the array. - Now open your
worldviewdata_table.luband add the following line
{###, [mapname].rsw, x¹, y¹, x², y², WORLD_MSGID.MSI_###_[MAPNAME],}
IMPORTANT
The ### number at the start of this array appears to be corresponding to a general “block” location on the map.
e.g. If you’re adding a map somewhere in the Payon area, you would want this number to be “111”,
however if you’re adding it in the area of Rachel, you’d want the number to be “105”.
In short, whenever you’re adding maps, always take a look at the numbers of the maps close to your new map,
use those numbers.
If your map doesnt appear on the worldmap, this is more than often the culprit behind it! - x¹, y¹, x², y² stand for the start and end coordinates of the map box which gets drawn on the world map.
-
Go to
data\luafiles514\lua files\datainfo\(Optional)
This is where you will be adding the kafra teleporting service animations.
Open the filekaframovemapservicelist.luband add Kafra teleport service information to your map as well as KafraMinimapPos
I am not certain what the parameters in this array do, if anyone has any idea, please let me know.
Navigation
IMPORTANT
Remember to make a backup of it before you start working on it.
Open the navigation folder and add your custom map to the navi_map_krpri.lub.
To do that, open up the file, scroll all the way down the list and add your map in the following format { [mapname], Display name, ID, xSize, ySize }
If you don't have any files, you can use the navigenerator.bat included in the server folder which is generator if you buildcompile it via your rAthena.sln and automatically generate them based on the NPC's and Maps which are available for you.
NOTE
The Display name is going to be name displayed over your map
There are 3 values for the IDs
(I am not 100% certain about what they are exactly, will need to research it more - then I will update the information here)
- 5001 is used for standard maps, such as Towns, Fields, Dungeons.
- 5002 appears to be used for maps which have clone counterparts
- 5003 is used for indoor maps
xSize and ySize correspond to the values of gat.Width as well as gat.Height
Adding connections between neighbouring maps
To do that, you want to open `navi_link.lub` and add connections to; as well as from the neighbouring maps in the following format
`{ [yourmap] , [index], 200, 99999, [yourmapname]_[destmapname]_[index], , xCoord, yCoord, payo2, destCoord_x, destCoord_y},`
e.g.
`{ pay_arche, 14056, 200, 99999, pay_arche_payon_706, , 81, 17, payon,  228, 327 },`
`{ payon, 15327, 200, 99999, payon_pay_arche_1977, , 228, 329, pay_arche, 81, 22 },`
Duplicate/Clone Maps
Duplicating/cloning maps is very easy with the dataresnametable.txt,
which is takes original files and redirects the client to them instead files for your custom map which don't exist.
This makes copy & paste of original files unnecessary.
Layout
Custom Mapname.gnd#Original Mapname.gnd#
Custom Mapname.gat#Original Mapname.gat#
Custom Mapname.rsw#Original Mapname.rsw#
À¯ÀúÀÎÅÍÆäÀ̽º\map\Custom Mapname.bmp#À¯ÀúÀÎÅÍÆäÀ̽º\map\Original Mapname.bmp#
Remember to either use a Map Cache Editor or the mapcache.bat from rAthena.
Skill Icons
First of all you need the data files, those are:
- Sprite and Act of your custom icon.
- Item Bmp of your custom Icon.
Steps
-
Place your custom Icon Sprite and Act in
data/sprite/¾ÆÀÌÅÛIMPORTANT
The icon need to be named exactly as the skill name displayed in the DB,
if you don't know it, you have 2 choices, open skill_db.txt or login into your server
and use the command @skillid "name" to confirm.
RO data.grf brought 3 party icons as default, but the name was changed and I had to rename it according to the Skill Name in the skill_db.yml -
Place the Custom Icon BMP in
data/texture/À¯ÀúÀÎÅÍÆäÀ̽º/item
IMPORTANT
As step #1, It need to be named exactly as the skill name, also need to be bmp size 24x24
Editing Lua Files
Some Skills do not exist in the lua files, and the must be added because files are conected and they take each other names as reference to read information, for example if you only add the sprites and bmp, it does'nt guarantee that your skill will show the icon, just because you added files with the name. -
Go to
data\luafiles514\lua files\skillinfoz -
skillid.lub
In this file you need to check if your current skill exist! if not, you need to add a new one according to the skill name, and skillid number. -
skilldescript.lub
In this file if your customized icon belong to a non-included skill in this file, you will have to add or include the new skill, because a name need to be taken as reference there.For Example: Party Skills are not included in the txt skilldescript.lub, in order to recognize the custom icon, the skill must be created or added into that file.
You can do the same for other skills such as Darkstrike, Dragon Fear, etc, respecting the lime formats of the luafiles " ", -
skillinfolist.lub
This file include a list of every skill registered, of course if you use an icon for a new skill, you need to add the skill in this file.
This file also display son information in the game skill window.
Structure
This information do not affect the skill sctructure in game, but it is necessary
because its used to display information when scrolling mouse over the skill icon,
and casting ranged skills, if you cast a skill no included in this file,
maybe the range will not be recognized and it will pop up a warning of cant get skill range.
[sKID. "the exactly name of the skill must be added there, don't mess with that."] = {
"ICON NAME";
SkillName = "This is the tex that the character will display when casting the skill",
MaxLv = the max level of the skill existing in the skilldb.txt.
SpAmount = { sp consumed by level according to the skilldb structure, this will be showed in the player skill window}
bSeperateLv = true for seperated skill leves such as warmwind, teleport, gospel etc, false to fix the skill to the last level applied,
AttackRange = {Range of the skill according to the skill level range of skills in the skill_db.txt}
Random Options
Original by Easycore
Introduction
In this guide I will introduce you how to implement custom Random Options.
I will use as an example the bonus "bAddEff".
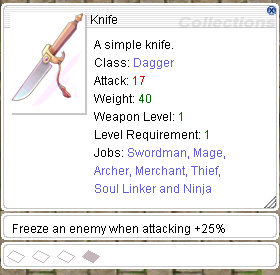
For display our custom options must be added to data\luafiles514\lua files\datainfo\enumvar.lub and `data\luafiles514\lua files\datainfo\addrandomoptionnametable.lub
enumvar.lub
Find:
VAR_CRITICAL_RATE = { 254, 10 },
And add:
WEAPON_FREEZE = {255, 0 },
The first number must be same that added in `db\re\item_randomopt_db.yml
addrandomoptionnametable.lub
Find:
[EnumVAR.MDAMAGE_SIZE_LARGE_USER[1]] = "Magical resistance Large size monster +%d%%",
And add:
[EnumVAR.WEAPON_FREEZE[1]] = "Freeze an enemy when attacking +%d%%",
%d% is equal to ROA_VALUE.
After completing all of the above your Random Option is ready to use.
Remember that there is documentation of how to add random options to items and a sample npc.
Enchant System
Original by khyle650
You need to add an entry in data\luafiles514\lua files\ItemDBNameTbl.lub of your item
and the enchant details in data\luafiles514\lua files\Enchant\EnchantList.lub.
ItemDBNameTbl.lub Example
	F_Ein_Weapon_Hammer = 102124,
	Diabolus_Armor = 2375,
	Diabolus_Boots = 2433,
	Diabolus_Helmet = 5808,
	Diabolus_Manteau = 2537,
	Diabolus_Ring = 2729,
	Diabolus_Robe = 2374
EnchantList.lub Example
Table[68] = CreateEnchantInfo()
Table[68]:SetSlotOrder(3, 2, 1)
Table[68]:AddTargetItem("Diabolus_Armor")
Table[68]:AddTargetItem("Diabolus_Boots")
Table[68]:AddTargetItem("Diabolus_Helmet")
Table[68]:AddTargetItem("Diabolus_Manteau")
Table[68]:AddTargetItem("Diabolus_Ring")
Table[68]:AddTargetItem("Diabolus_Robe")
Table[68]:SetCondition(0, 0)
Table[68]:ApproveRandomOption(true)
Table[68]:SetReset(true, 100000, 3000000)
Table[68]:SetCaution("Diabolus Set Enchantment\nSuccess Chance: 100%\nReset Chance: 100%, will not be destroyed on failure")
Table[68].Slot[3]:SetRequire(100000)
Table[68].Slot[3]:SetSuccessRate(100000)
Table[68].Slot[3]:SetGradeBonus(1, 0)
Table[68].Slot[3]:SetGradeBonus(2, 0)
Table[68].Slot[3]:SetGradeBonus(3, 0)
Table[68].Slot[3]:SetGradeBonus(4, 0)
Table[68].Slot[3]:SetEnchant(0, "Èû1", 12460)
Table[68].Slot[3]:SetEnchant(0, "ÀÎÆ®1", 12470)
Table[68].Slot[3]:SetEnchant(0, "¾îÁú1", 12470)
Table[68].Slot[3]:SetEnchant(0, "¹ÙÅ»1", 12470)
Table[68].Slot[3]:SetEnchant(0, "·°1", 12460)
Table[68].Slot[3]:SetEnchant(0, "µ¦1", 12470)
Table[68].Slot[3]:SetEnchant(0, "Èû2", 3500)
Table[68].Slot[3]:SetEnchant(0, "ÀÎÆ®2", 3500)
Table[68].Slot[3]:SetEnchant(0, "¾îÁú2", 3500)
Table[68].Slot[3]:SetEnchant(0, "¹ÙÅ»2", 3500)
Table[68].Slot[3]:SetEnchant(0, "·°2", 3500)
Table[68].Slot[3]:SetEnchant(0, "µ¦2", 3500)
Table[68].Slot[3]:SetEnchant(0, "Èû3", 700)
Table[68].Slot[3]:SetEnchant(0, "ÀÎÆ®3", 700)
Table[68].Slot[3]:SetEnchant(0, "¾îÁú3", 700)
Table[68].Slot[3]:SetEnchant(0, "¹ÙÅ»3", 700)
Table[68].Slot[3]:SetEnchant(0, "·°3", 700)
Table[68].Slot[3]:SetEnchant(0, "µ¦3", 700)
Table[68].Slot[3]:AddPerfectEnchant("Èû1", 500000)
Table[68].Slot[3]:AddPerfectEnchant("ÀÎÆ®1", 500000)
Table[68].Slot[3]:AddPerfectEnchant("¾îÁú1", 500000)
Table[68].Slot[3]:AddPerfectEnchant("¹ÙÅ»1", 500000)
Table[68].Slot[3]:AddPerfectEnchant("·°1", 500000)
Table[68].Slot[3]:AddPerfectEnchant("µ¦1", 500000)
Table[68].Slot[3]:AddPerfectEnchant("Èû2", 1000000)
Table[68].Slot[3]:AddPerfectEnchant("ÀÎÆ®2", 1000000)
Table[68].Slot[3]:AddPerfectEnchant("¾îÁú2", 1000000)
Table[68].Slot[3]:AddPerfectEnchant("¹ÙÅ»2", 1000000)
Table[68].Slot[3]:AddPerfectEnchant("·°2", 1000000)
Table[68].Slot[3]:AddPerfectEnchant("µ¦2", 1000000)
Table[68].Slot[3]:AddPerfectEnchant("Èû3", 3000000)
Table[68].Slot[3]:AddPerfectEnchant("ÀÎÆ®3", 3000000)
Table[68].Slot[3]:AddPerfectEnchant("¾îÁú3", 3000000)
Table[68].Slot[3]:AddPerfectEnchant("¹ÙÅ»3", 3000000)
Table[68].Slot[3]:AddPerfectEnchant("·°3", 3000000)
Table[68].Slot[3]:AddPerfectEnchant("µ¦3", 3000000)
Table[68].Slot[3]:AddUpgradeEnchant("Èû1", "Èû2", 500000)
Table[68].Slot[3]:AddUpgradeEnchant("Èû2", "Èû3", 1000000)
Table[68].Slot[3]:AddUpgradeEnchant("ÀÎÆ®1", "ÀÎÆ®2", 500000)
Table[68].Slot[3]:AddUpgradeEnchant("ÀÎÆ®2", "ÀÎÆ®3", 1000000)
Table[68].Slot[3]:AddUpgradeEnchant("¾îÁú1", "¾îÁú2", 500000)
Table[68].Slot[3]:AddUpgradeEnchant("¾îÁú2", "¾îÁú3", 1000000)
Table[68].Slot[3]:AddUpgradeEnchant("¹ÙÅ»1", "¹ÙÅ»2", 500000)
Table[68].Slot[3]:AddUpgradeEnchant("¹ÙÅ»2", "¹ÙÅ»3", 1000000)
Table[68].Slot[3]:AddUpgradeEnchant("·°1", "·°2", 500000)
Table[68].Slot[3]:AddUpgradeEnchant("·°2", "·°3", 1000000)
Table[68].Slot[3]:AddUpgradeEnchant("µ¦1", "µ¦2", 500000)
Table[68].Slot[3]:AddUpgradeEnchant("µ¦2", "µ¦3", 1000000)
Table[68].Slot[2]:SetRequire(200000)
Table[68].Slot[2]:SetSuccessRate(100000)
Table[68].Slot[2]:SetGradeBonus(1, 0)
Table[68].Slot[2]:SetGradeBonus(2, 0)
Table[68].Slot[2]:SetGradeBonus(3, 0)
Table[68].Slot[2]:SetGradeBonus(4, 0)
Table[68].Slot[2]:SetEnchant(0, "Èû1", 12460)
Table[68].Slot[2]:SetEnchant(0, "ÀÎÆ®1", 12470)
Table[68].Slot[2]:SetEnchant(0, "¾îÁú1", 12470)
Table[68].Slot[2]:SetEnchant(0, "¹ÙÅ»1", 12470)
Table[68].Slot[2]:SetEnchant(0, "·°1", 12460)
Table[68].Slot[2]:SetEnchant(0, "µ¦1", 12470)
Table[68].Slot[2]:SetEnchant(0, "Èû2", 3500)
Table[68].Slot[2]:SetEnchant(0, "ÀÎÆ®2", 3500)
Table[68].Slot[2]:SetEnchant(0, "¾îÁú2", 3500)
Table[68].Slot[2]:SetEnchant(0, "¹ÙÅ»2", 3500)
Table[68].Slot[2]:SetEnchant(0, "·°2", 3500)
Table[68].Slot[2]:SetEnchant(0, "µ¦2", 3500)
Table[68].Slot[2]:SetEnchant(0, "Èû3", 700)
Table[68].Slot[2]:SetEnchant(0, "ÀÎÆ®3", 700)
Table[68].Slot[2]:SetEnchant(0, "¾îÁú3", 700)
Table[68].Slot[2]:SetEnchant(0, "¹ÙÅ»3", 700)
Table[68].Slot[2]:SetEnchant(0, "·°3", 700)
Table[68].Slot[2]:SetEnchant(0, "µ¦3", 700)
Table[68].Slot[2]:AddPerfectEnchant("Èû1", 500000)
Table[68].Slot[2]:AddPerfectEnchant("ÀÎÆ®1", 500000)
Table[68].Slot[2]:AddPerfectEnchant("¾îÁú1", 500000)
Table[68].Slot[2]:AddPerfectEnchant("¹ÙÅ»1", 500000)
Table[68].Slot[2]:AddPerfectEnchant("·°1", 500000)
Table[68].Slot[2]:AddPerfectEnchant("µ¦1", 500000)
Table[68].Slot[2]:AddPerfectEnchant("Èû2", 1000000)
Table[68].Slot[2]:AddPerfectEnchant("ÀÎÆ®2", 1000000)
Table[68].Slot[2]:AddPerfectEnchant("¾îÁú2", 1000000)
Table[68].Slot[2]:AddPerfectEnchant("¹ÙÅ»2", 1000000)
Table[68].Slot[2]:AddPerfectEnchant("·°2", 1000000)
Table[68].Slot[2]:AddPerfectEnchant("µ¦2", 1000000)
Table[68].Slot[2]:AddPerfectEnchant("Èû3", 3000000)
Table[68].Slot[2]:AddPerfectEnchant("ÀÎÆ®3", 3000000)
Table[68].Slot[2]:AddPerfectEnchant("¾îÁú3", 3000000)
Table[68].Slot[2]:AddPerfectEnchant("¹ÙÅ»3", 3000000)
Table[68].Slot[2]:AddPerfectEnchant("·°3", 3000000)
Table[68].Slot[2]:AddPerfectEnchant("µ¦3", 3000000)
Table[68].Slot[2]:AddUpgradeEnchant("Èû1", "Èû2", 500000)
Table[68].Slot[2]:AddUpgradeEnchant("Èû2", "Èû3", 1000000)
Table[68].Slot[2]:AddUpgradeEnchant("ÀÎÆ®1", "ÀÎÆ®2", 500000)
Table[68].Slot[2]:AddUpgradeEnchant("ÀÎÆ®2", "ÀÎÆ®3", 1000000)
Table[68].Slot[2]:AddUpgradeEnchant("¾îÁú1", "¾îÁú2", 500000)
Table[68].Slot[2]:AddUpgradeEnchant("¾îÁú2", "¾îÁú3", 1000000)
Table[68].Slot[2]:AddUpgradeEnchant("¹ÙÅ»1", "¹ÙÅ»2", 500000)
Table[68].Slot[2]:AddUpgradeEnchant("¹ÙÅ»2", "¹ÙÅ»3", 1000000)
Table[68].Slot[2]:AddUpgradeEnchant("·°1", "·°2", 500000)
Table[68].Slot[2]:AddUpgradeEnchant("·°2", "·°3", 1000000)
Table[68].Slot[2]:AddUpgradeEnchant("µ¦1", "µ¦2", 500000)
Table[68].Slot[2]:AddUpgradeEnchant("µ¦2", "µ¦3", 1000000)
Table[68].Slot[1]:SetRequire(300000)
Table[68].Slot[1]:SetSuccessRate(100000)
Table[68].Slot[1]:SetGradeBonus(1, 0)
Table[68].Slot[1]:SetGradeBonus(2, 0)
Table[68].Slot[1]:SetGradeBonus(3, 0)
Table[68].Slot[1]:SetGradeBonus(4, 0)
Table[68].Slot[1]:SetEnchant(0, "Èû1", 12460)
Table[68].Slot[1]:SetEnchant(0, "ÀÎÆ®1", 12470)
Table[68].Slot[1]:SetEnchant(0, "¾îÁú1", 12470)
Table[68].Slot[1]:SetEnchant(0, "¹ÙÅ»1", 12470)
Table[68].Slot[1]:SetEnchant(0, "·°1", 12460)
Table[68].Slot[1]:SetEnchant(0, "µ¦1", 12470)
Table[68].Slot[1]:SetEnchant(0, "Èû2", 3500)
Table[68].Slot[1]:SetEnchant(0, "ÀÎÆ®2", 3500)
Table[68].Slot[1]:SetEnchant(0, "¾îÁú2", 3500)
Table[68].Slot[1]:SetEnchant(0, "¹ÙÅ»2", 3500)
Table[68].Slot[1]:SetEnchant(0, "·°2", 3500)
Table[68].Slot[1]:SetEnchant(0, "µ¦2", 3500)
Table[68].Slot[1]:SetEnchant(0, "Èû3", 700)
Table[68].Slot[1]:SetEnchant(0, "ÀÎÆ®3", 700)
Table[68].Slot[1]:SetEnchant(0, "¾îÁú3", 700)
Table[68].Slot[1]:SetEnchant(0, "¹ÙÅ»3", 700)
Table[68].Slot[1]:SetEnchant(0, "·°3", 700)
Table[68].Slot[1]:SetEnchant(0, "µ¦3", 700)
Table[68].Slot[1]:AddPerfectEnchant("Èû1", 500000)
Table[68].Slot[1]:AddPerfectEnchant("ÀÎÆ®1", 500000)
Table[68].Slot[1]:AddPerfectEnchant("¾îÁú1", 500000)
Table[68].Slot[1]:AddPerfectEnchant("¹ÙÅ»1", 500000)
Table[68].Slot[1]:AddPerfectEnchant("·°1", 500000)
Table[68].Slot[1]:AddPerfectEnchant("µ¦1", 500000)
Table[68].Slot[1]:AddPerfectEnchant("Èû2", 1000000)
Table[68].Slot[1]:AddPerfectEnchant("ÀÎÆ®2", 1000000)
Table[68].Slot[1]:AddPerfectEnchant("¾îÁú2", 1000000)
Table[68].Slot[1]:AddPerfectEnchant("¹ÙÅ»2", 1000000)
Table[68].Slot[1]:AddPerfectEnchant("·°2", 1000000)
Table[68].Slot[1]:AddPerfectEnchant("µ¦2", 1000000)
Table[68].Slot[1]:AddPerfectEnchant("Èû3", 3000000)
Table[68].Slot[1]:AddPerfectEnchant("ÀÎÆ®3", 3000000)
Table[68].Slot[1]:AddPerfectEnchant("¾îÁú3", 3000000)
Table[68].Slot[1]:AddPerfectEnchant("¹ÙÅ»3", 3000000)
Table[68].Slot[1]:AddPerfectEnchant("·°3", 3000000)
Table[68].Slot[1]:AddPerfectEnchant("µ¦3", 3000000)
Table[68].Slot[1]:AddUpgradeEnchant("Èû1", "Èû2", 500000)
Table[68].Slot[1]:AddUpgradeEnchant("Èû2", "Èû3", 1000000)
Table[68].Slot[1]:AddUpgradeEnchant("ÀÎÆ®1", "ÀÎÆ®2", 500000)
Table[68].Slot[1]:AddUpgradeEnchant("ÀÎÆ®2", "ÀÎÆ®3", 1000000)
Table[68].Slot[1]:AddUpgradeEnchant("¾îÁú1", "¾îÁú2", 500000)
Table[68].Slot[1]:AddUpgradeEnchant("¾îÁú2", "¾îÁú3", 1000000)
Table[68].Slot[1]:AddUpgradeEnchant("¹ÙÅ»1", "¹ÙÅ»2", 500000)
Table[68].Slot[1]:AddUpgradeEnchant("¹ÙÅ»2", "¹ÙÅ»3", 1000000)
Table[68].Slot[1]:AddUpgradeEnchant("·°1", "·°2", 500000)
Table[68].Slot[1]:AddUpgradeEnchant("·°2", "·°3", 1000000)
Table[68].Slot[1]:AddUpgradeEnchant("µ¦1", "µ¦2", 500000)
Table[68].Slot[1]:AddUpgradeEnchant("µ¦2", "µ¦3", 1000000)
Maybe I will dive into it some time how the EnchantList.lub is structured.
Disclaimer
I don't take any credit for any of the copied guides.